
Jupyter Notebook stands as a cornerstone in the realm of interactive computing platforms, offering a potent mix of flexibility, accessibility, and collaboration. It enables users to weave together live code, equations, visualizations, and narrative text, all within a web-based interface. If you’re delving into the world of data science, machine learning, or scientific computing, having Jupyter Notebook at your fingertips is invaluable. In this tutorial, we’ll guide you through the installation process on Ubuntu 22.04, ensuring you’re equipped with this powerful tool.
Prerequisites
Before we embark on the installation journey, make sure you have the following:
- A server running Ubuntu 22.04.
- A valid domain name pointed to your server’s IP address.
- Root access to your server.
Getting Started
Let’s dive right in by updating and upgrading your system’s software packages:
apt update -y
apt upgrade –y
With your packages up to date, we’re ready to proceed.
Install Python
Jupyter Notebook relies on Python, so let’s ensure it’s installed along with other necessary dependencies:
apt-get install python3 python3-pip -y
Verify your Python installation
python3 –version
Ensure your PIP (Python Package Installer) is up to date
pip3 install –upgrade pip
Install Jupyter Notebook
Let’s create a directory to house your notebook and set up a Python virtual environment:
mkdir -p /opt/project
cd /opt/project
virtualenv notebookenv
source notebookenv/bin/activate
Now, let’s install Jupyter Notebook
pip install jupyter
With Jupyter Notebook installed, let’s launch it:
jupyter notebook –allow-root
Generate Jupyter Notebook Password
It is recommended to secure the Jupyter Notebook with password. First, generate a Jupyter Notebook configuration file with the following command:
jupyter notebook –generate-config
You should see the following output
Writing default config to: /root/.jupyter/jupyter_notebook_config.py
To enhance security, let’s set a password for Jupyter Notebook:
jupyter notebook password
Next, deactivate from the Python virtual environment with the following command:
deactivate
Create a Systemd Service File for Jupyter Notebook
To ensure Jupyter Notebook runs seamlessly, let’s create a systemd service file:
vi /etc/systemd/system/jupyter.service
Populate the file with the following content
[Unit]
Description=Jupyter Notebook
[Service]
Type=simple
PIDFile=/run/jupyter.pid
ExecStart=/opt/project/notebookenv/bin/jupyter-notebook –config=/root/.jupyter/jupyter_notebook_config.py –allow-root
User=root
Group=root
WorkingDirectory=/opt/project/notebookenv
Restart=always
RestartSec=10
[Install]
WantedBy=multi-user.target

After saving and closing the file, reload the systemd daemon
systemctl daemon-reload
Start and enable the Jupyter Notebook service
systemctl start jupyter
systemctl enable jupyter
To verify the status of the Jupyter Notebook, run the following command:
systemctl status jupyter
Configure Nginx as a Reverse Proxy for Jupyter Notebook
To access Jupyter Notebook via port 80, let’s configure Nginx as a reverse proxy:
apt-get install nginx -y
vi /etc/nginx/conf.d/jupyter.conf
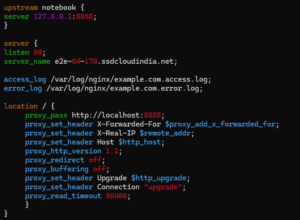
Add the following configuration
upstream notebook {
server 127.0.0.1:8888;
}
server {
listen 80;
server_name jupyter.example.com;
access_log /var/log/nginx/example.com.access.log;
error_log /var/log/nginx/example.com.error.log;
location / {
proxy_pass http://localhost:8888;
proxy_set_header X-Forwarded-For $proxy_add_x_forwarded_for;
proxy_set_header X-Real-IP $remote_addr;
proxy_set_header Host $http_host;
proxy_http_version 1.1;
proxy_redirect off;
proxy_buffering off;
proxy_set_header Upgrade $http_upgrade;
proxy_set_header Connection “upgrade”;
proxy_read_timeout 86400;
}
}
After saving and closing the file, verify the Nginx configuration
nginx -t
If the test is successful, restart Nginx
systemctl restart nginx
systemctl status nginx
Next, edit the Jupyter Notebook configuration file and enable remote access:
vi /root/.jupyter/jupyter_notebook_config.py
Edit the following line:
c.ServerApp.allow_remote_access = True
Save and close the file, then restart the Jupyter Notebook service to apply the changes:
systemctl restart jupyter
Once you are done, you can proceed to the next step.
Access Jupyter Notebook
Now, open your web browser and access the Jupyter Notebook using the URL http://jupyter.example.com. You will be asked to provide your Jupyter Notebook password on the following screen:
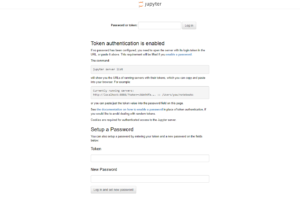
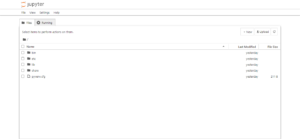
Provide your password and click on the Login button. You should see the Jupyter Notebook dashboard on the following screen:
Conclusion
Congratulations! You’ve successfully installed Jupyter Notebook on Ubuntu 22.04 and configured it with Nginx as a reverse proxy. Armed with this powerful tool, you’re ready to embark on your data exploration and analysis journey. Should you have any questions or encounter hurdles along the way, don’t hesitate to reach out. Happy coding!
Leave a Reply